I’ve been keeping myself occupied with my models. But last weekend, I didn’t want to spend it torturing plastic again. Sunday morning, I felt the familiar itch to go somewhere locally and do some photography. So, I grabbed up my gear and headed downtown. I had no expectations about this brief trip. I just wanted to spend some time behind my camera. While driving to Detroit, I figured something on Belle isle should be in bloom. And the large patches of yellow lilies on the approach to the bridge to the island was very promising. Once there, the crisp morning light illuminated the Detroit skyline against some approaching dark and moody clouds. I made my way over to the fountain where to my delight the Cherry blossoms were in full bloom.
Soon the angry sky was overhead, the sharp contrasting light faded, and a light rain slowly overtook the island. And in a spirited pace, I made my way back to the comfort of my car where I sipped on my coffee and reviewed my shots. With the rain beginning to let up, I wondered if there were any tulips in bloom around the conservatory. As I got closer, I spotted numerous colorful signs of spring blossoms. But unfortunately, the conservatory was closed. That was strike one.
Well, let’s go hit up those patches of lilies before the bridge. I headed off the island and found parking close by the lily patches, but this would be strike two. The passing rain clouds was still hiding the Sun, making the shots flat and muted. But my itch to keep making photos was still strong. So, I drove into downtown to look for other spring blossoms. If anything, it would chew up some time for the sky to clear and maybe come back to the lilies later.
Driving through the city, rekindled my love for Detroit. All the familiar sites along with some new ones. But still no tulips. So, I headed down Grand River boulevard to check for some new street art. There were a few blocks that was the epicenter for graffiti in Detroit. But now, there’s barely any to be found. I did manage to spot a new piece by Sintex and other artists. I’ll call this a foul ball.
With the sky slowly clearing and my desire to photograph some tulips unfulfilled, I head back downtown. I made my way to Campus Martius and guess what was in bloom and seem to be peppered everywhere? Tulips! Red, white, yellow, pink, orange… holy fuck! Where can I park? Eagerly searching for a spot, minutes seemed like hours and all the pretty little petals would be dead and gone before I would find a parking spot. After what seemed like a week, I found one.
Parked about two blocks away from the little beauties, I’m now facing a problem. What lense to bring? The 24-70mm or the 70-200mm? Fuck it, the 24-70 should be enough Right?! I slapped in on my 5DSR, put everything else out of sight, lock up and make my way to the plethora of tulips. Finally, tulips in bloom and in some gorgeous light. But after about 5 or 6 shots, I found myself wanting more focal length. The 24-70 could not get in close enough to produce the images in my minds eye.
Time to hike back to the car, switch lenses, walk back and continue shooting. This time, after the first few shots, I heard myself say, “I love this lense”. Home Run!
After using up all my bag of tricks and finally fulfilling my desire to photograph some tulips, it was time to head back home. Despite the hiccups, it was good to get out of my pandemic weekend routine and practice one of my other passions.
We have all seen crappy photos of breathtaking models and wished they put the same effort in taking photos as they did in to building their masterpieces. From poorly lit images, distracting backgrounds to badly composed shots. Photographing scale models is essentially Macro photography. Which requires having an understanding of how to control your depth of field while shooting close to your subject. And like every creative craft, photography is a learned skill. I’m going to share my process of photographing models that I’ve used over the years that may help you get better results photographing your models using a DSLR or a point & shoot camera. It doesn’t matter what scale you build or if you build cars, armor, ships or aircraft, all the techniques are going to work the same.
Disclaimer: This tutorial is not the only way to photograph scale models. This may or may not work well with you.
There are three things I want to clarify before we get started. First, this tutorial will focus on giving you a better understanding of the photo process, it is not to speed it up. As well as this is not for someone who is submitting images to a publication. This is to help the everyday modeler take better photographs of his or her models to share online.
Another thing is the time frame of photographing your model. This is not a 5 minute job. Just like building models, If you rush it your results will be shit. You’re going to have to take your time with this process. It could be two or three hours.
And the last point is cost. This is not a cheap and easy way to photograph your models. Nor is it going to be expensive. But there will be a few items you will need if you’re to complete this tutorial.
Let’s start with a brief discussion about the pros and cons of DSLR’s, point & shoot cameras and why not to use your mobile device. Some types of cameras outperform others and the old saying “You get what you pay for” holds true in photography. But if you know your camera’s limitations and work within them, you can capture some quality images.
Digital single lens reflex (DSLR) and Mirrorless DSLR offers the greatest control over the look of your photos along with having better image quality. They have the ability to switch lenses unlike point and shoot cameras. But it comes with a steep price and a higher learning curve.
Point & shoot cameras(P&S)are compact and user-friendly cameras. They offer similar features like their more expensive siblings. But have simplified controls along with the inability to change lenses.
Mobile devices have come a long way from a few years ago but the major drawback is that they lack control. You can not select your aperture, shutter speed, ISO… anything to control the look of your image.
But before we continue, there are some basic photography terminology you must know and understand. Don’t be intimidated with these new terms, it’s just part of the learning process.
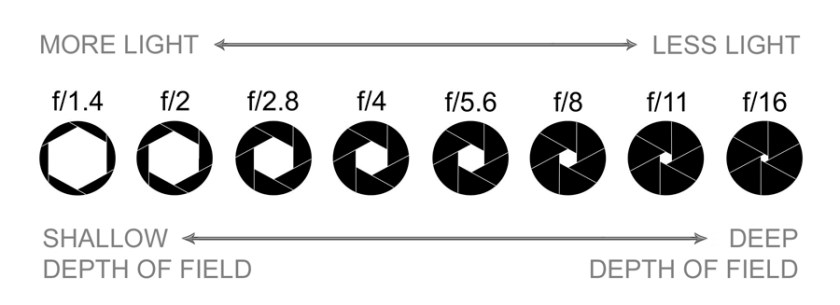
Aperture is the opening in the lens that lets light pass through and enter the camera. It is measured in f-stops. Here’s where it gets weird, the larger the f-stop, the smaller the number. For example, f/1.8 is a large f-stop and f/22 is a small one. The aperture also controls the depth of field in your image. More about that below.
Shutter allows light to pass through the lens in a time frame. Shutter speeds are measured in fractions of a second. Example, 1/500th, 1/400th, 1/320th.
ISO is how sensitive your camera’s sensor is to light. For example, an ISO of 100 means the sensor isn’t very sensitive. And at ISO 3200 is more sensitive. The trade off is at high ISO the grainier the image.
Depth of Field (DOF) is the area in front and behind the focal point that’s in focus. Controlled by the aperture, the larger the f-stop like F/2.8, the shallower your DOF. And with a smaller f-stop like F/11, the larger your DOF. And the closer you are to your subject, your DOF gets compressed. Meaning if you focused on something about 12 inches away @ f/2.8, your DOF will be very shallow, like an inch or less. But if you focused on something 100 ft away, your DOF will be measured in feet and not inches.
Exposure is simply how light or dark your image is. Which is determine by a combination of aperture, shutter and ISO.
Exposure Compensation allows you to override the exposure selected by the camera’s light meter, in order to darken or brighten your image. Have you ever taken a picture of something and the photo turned out too dark or light? It’s because the cameras light meter sees things differently then we do. For example, if you focus on something that is white, the camera sees it as super bright and wants to select the fastest shutter speed it can. Resulting in an underexposed image that is dark overall. This is due to there was not enough light getting to the sensor during the extremely short time the shutter was open. And the opposite happens with dark subjects, the camera wants to select a longer shutter speed. Making the image look too bright and washed out due to too much light reaching the sensor.
Below is an example of using exposure compensation. The first image was shot with no compensation and looks a bit dark. The second is a full stop under(-1) which is way too dark. And the last is a full stop over(+1).
no compensation
-1 stop
+1 stop
White Balance is the color temperature in your image. Setting it can be frustrating and tricky. Even I, a seasoned photographer doesn’t like playing around with it.
Auto focus points: Your camera has multiple auto focus points to select what is to be in focus. If you’re using a DSLR or P&S camera, you’re going to have to know how to select and change the auto focus points. Look in your camera’s manual to learn how. And if you don’t have or lost it, check Google for an online manual.
File type: For sharing images on social media and various online sites, you do not need the complexity of shooting and processing a RAW file. For this tutorial as well as to simplify things, Jpeg will do fine.
If you’re new to photography, I know that this is a lot to digest. But the more you know and understand the terminology associated with photography, the better off you will be. There are a bunch of informative sites out there to further help your understanding. Remember, Google and YouTube are your know it all friends.
Let’s get into what you’re going to need for your photo shoot.
Camera: If you have a DSLR, Mirrorless DSLR or a point and shoot, the process are pretty much the same. Don’t try this with your mobile device.
My Sony ZV-1
My Canon 7D MKII with 17-85mm and 100mm Macro
Lense: You don’t need a super expensive lense to photograph scale models. Most kit lenses that comes with DSLRs will do fine. You don’t want to use a wide angle lense because they tend to distort the perspective and produce unnatural looking images.
Tripod: If you don’t have one, it’s time to get one. They come in all shapes and sizes. Search your favorite online store for “small tripod” and find one that is in your price range. My only advice is don’t get a flexible/bendable leg tripod. The ones that look like insect legs.
Backgrounds: Just like your kits, don’t be cheap. Do not use a bed sheet, driveway or sidewalk. What you want is a smooth seamless solid color material that is larger than your model. Preferably neutral colors such as tans and grays.
Canson Mi-Teintes Art paper
I have two different methods for setting up backgrounds. The simpler way is to use any large flat surface. Such as a big piece of foam core or a large tabletop so when I zoom in and tilt my camera downwards, it fills the frame. This does require more space but it’s super easy. The only drawback is you can only shoot the model so low before you start to reveal the lack of a vertical background. But you can get around this by having a solid color surface such as a wall close to it.
Set up one
Shot from set up one
shooting low in set up one
image from shooting low in set up one
The other method uses a wall to hold up your background with a few pieces of tape. Let whatever material you’re using naturally curve from the wall to the surface your model is on. This will create a seamless and clutter free backdrop behind your model. This setup allows you to place your camera as low as you want.
Set up two
Image from Set up two
Shutter Release: An essential tool to remotely fire the shutter without touching or disturbing the camera.
Self-Timer function: If you don’t have a shutter release, the self timer is the next best thing. Most DSLRs and P&S cameras have some form of a timer feature. Turn to your manual to how to access it.
Photo editing software: If it’s Photoshop, Lightroom, GIMP or whatever program, you should have a basic understanding of the program to edit your images. I suggest searching on Google and YouTube to find informative tutorials. If you do not have any editing software, look here for an available free program.
Another editing option is to do it on a tablet or iPad. Adobe Lightroom is available on iPad as well as Photoshop Express Photo Editor.
Now that we gone over some new vocabulary along with gathering our photographic supplies, it’s time to shoot right?! Not yet. Before we start taking pictures, we must set up the photo shoot.
Photo shoot setup
You probably noticed that “lighting” is not included in the list of things needed. This is because the Sun will provide all the light you will need. Moreover, using sunlight as our light source means we do not have to deal with setting up multiple light sources. I suggest shooting on a sunny day over a cloudy one. Also, using the Sun as our light source make selecting our white balance simple.
We are going to set up our photo shoot near or in front of a window but not in direct sunlight. Shooting in direct sunlight will cause the highlights on your model to be too bright along with the shadows too dark. I often set up my photo shoot on a wall that is 90 degrees from the light source window. I’ll use a large table and sometimes even use the floor for my shooting area. Make sure you have plenty of space to move your model in various positions along with room to move your camera around the photo shoot.
As I discussed earlier, I have two ways to set up backgrounds. Whatever method you’re going to use, make sure it’s larger than your model so that it fills the frame. It’s time to move on to setting up the camera.
Camera setting
Firmly attach your camera to your tripod.
Turn ON your camera.
Take lens cap OFF.
Make sure auto focus is ON.
Turn the flash OFF. There is no need to introduce a new light source. Plus, using the flash at such close range, will produce harsh, unnatural and distracting shadows.
Plug in shutter release or switch to timer.
Select “Aperture priority”. On most cameras it is labeled “A” or “AV”. Then select a F-stop somewhere in between f/10 to f/22. I can’t tell you the perfect F-stop that will have the best depth of field for your model. You’re going to have to shoot, check your depth of field and adjust accordingly. If your depth of field is too shallow, change it to a smaller F-stop (larger number), reshoot and review.
Select an ISO in between 100 and 200 to reduce the digital noise.
If your P&S has a Macro setting, make sure to switch to it.
Set your White balance to “Auto” or “Sunny”.
File type, Select the largest and finest Jpeg.
Now that we have our background and camera set up, now it’s time to start taking pictures. It’s not as simple as placing your model in front of the background and start snapping photos. There are a few things we must consider as we take photos.
Photo process
• While looking through the viewfinder or rear display screen, look around the model to make sure the background fills the frame. Make sure all you see is the background color.
• Select and change the auto focus point to the most logical area of interest on the model. Such as the cockpit of an aircraft, the turret of a tank, the bridge of a ship, eyes of a figure…
• While the shutter is open, do not touch the camera, tripod or the table your model is on to ensure it remains completely motionless. The shutter is going to be long. Don’t worry. This is not action photography with lightning fast shutter speeds. Let the camera do its thing and wait to see the results.
• After the shutter closes, review the image. Is the image in focus and sharp? If not, reshoot it and make sure you don’t move the camera, tripod or your model.
• Is the depth of field covering the whole model? If not, change to a smaller F-stop (larger number)
• When you’re reviewing the image on the rear LCD screen, ask yourself “Do I like this shot?” If not, recompose and reshoot until you’re happy. Remember, the number of photos you can take is only limited to the size of your memory card. So, take as many as you like.
• If your image is too dark, you’re going to want to overcompensate to get a proper exposure. Start at +1/3, shoot and review. If it’s still dark, compensate some more until it looks right. And do the opposite when your image is too light.
Basic shots
If you struggle with the artistic part of photography, don’t stress. Let’s go over a few basic shots to help you show off your model. Here’s a few shots to try.
Three quarter front
Three quarter rear
Sides
Underside
Three-quarter front
Three-quarter rear
Side view
Bottom
Don’t be afraid to play around and try something different. Move around the model and when you see something that catches your eye, place your camera in the same location as where you saw it and take a picture. Review the image to see if it matches the image in your minds eye. If not, zoom in or out, get higher or lower, move left or right… shoot and review until you feel you got the shot you were looking for.
Detail shots
With the basic shots out of the way, it’s time to capture all those wonderful little details. Something you should be aware of for both DSLRs and P&S cameras, are focus limits. All lenses have a minimum distance it can focus in on something. Meaning if you’re too close to your model and try to focus the lens, the auto focus will hunt around and not “lock on”. If this happens, just move the camera a couple of inches away from your model and retry. Here’s a few ideas for detail shots.
Weapons
Wheels and landing gear
Head and taillights
Flight controls
Intakes, engines and nozzles
Cockpit of aircraft, bridge of a ship, turret of a tank, face of a figure, grill of a car…
Panel lines and markings
Keep your background and model in place while you review your photos. So, if there is a photo that didn’t turn out the way you liked, you can easily reshoot it. While reviewing your images, check the depth of field, sharpness of the photo and overall aesthetics. Once you’re happy with your images, take down your background and put your model away.
Sorting your images to share
Now that your photo shoot is over, it’s time to download your images to your PC or whatever device you’re going to use to edit them. Selecting what images to share and what not to share can be frustrating. You want to select photos that highlight the features of your model. Maybe it’s the paint job or weathering, some custom or scratch-built item. It’s those things you want to concentrate on. And on the flip side of that, you don’t want to flood your viewers with a ton images that’s very similar. It’s a balancing act for sure. Below is a link to my sorting process which I developed over the years and can help you with the pain of sorting.
Post process is where we are going to edit our images with photo editing software. If it’s photoshop, Lightroom or even GIMP, the task should be the same. How you achieve them will vary from program to program. Removing dust spots, leveling the image, adjusting exposure, resizing and resharpening are the things you want to accomplish. If you do not know how to do these tasks, again Google and YouTube are your know it all friends.
Again, this is not the only way to photograph scale models. This is just a process I’ve developed and use successfully for years. And you can see my results on my website. Every image was shot using this natural light process. Remember, have fun and keep learning new stuff about photography and your gear.
During my first of manyadventures in Japan, I noticed that I had a camera gap. Meaning I felt there were times where my DSLRs were too much camera to use while site seeing. As well as my iPhone 11 Pro max did not offer the versatility of a point & shoot camera. I really enjoy how freely it is to capture images with it and not interrupt the pace of the experience. But the major drawback of smartphone camera systems is the inability to change settings such as aperture, shutter or ISO.I still love shooting any of my DSLRs but… they are cumbersome when it come to taking photos in the moment without becoming an observer.
And ever since then, I’ve wanted a point and shoot camera to fill in that gap. Something pocket size with a respectable auto focus system, about 20 megapixels and with a fast wide to medium zoom. And Thursday, my new Sony’s ZV-1 showed up. It has a 20.1-megapixel sensor, Zeiss 9.4-25.7mm (35mm equivalent, 24-70mm) F/1.8-2.8 lens. It too has a shit ton of autofocus points and I can fit it into any of my pockets with no problem. Now with new gear, it’s testing time.
I wanted to spend some time getting familiar with my new Sony’s features and functions along with capturing some images of the fall foliage in and around Detroit. After a long non-creative workday Friday, I was eager to get home and play with my new little point & shoot. But unfortunately, Mother Nature was being a bitch and was not willing to cooperate. The weather conditions were hit or miss, and I’d hope for more favorable weather in the morning. Woke up early Saturday morning but my plans were to do chores before playing. I needed to start laundry, gas up my car along with do some grocery shopping. And after that, I was going to go and have some fun at Belle isle with my little Sony.
During the overnight hours, the temperature dropped down close to freezing, so I remote started the car. Grabbed my glasses, wallet, keys, mask and was out the door. Stopped at 7-Eleven to get gas before heading to the grocery store. And as I was patiently pumping gas in the frosty morning air, I looked up and noticed the abundance of fall color popping all around me in the soft morning light. That’s when I heard myself say, “Go back home, get your camera and let’s go shooting!”
So, I raced back to my apartment, left the car running and doubled stepped it up the stairs. I thrust the key in the door, twist right, push and the door fly’s open! Sprinted directly to my cheap Meijer nightstand where my Sony was chilling and scooped it up. Locked the door behind me and it was a mad rush to the car. As I made my way to the freeway, I spotted a vibrant autumn scene at a nearby church. It looked like there was something going on at the entrance of the church and I didn’t want to disturb them. So, I timidly pulled in the driveway, stopped short and turned on my hazards. With my little Sony in hand, I respectfully and inconspicuously captured the stunning autumn scene. Then jumped back in my ride for some quick heat and was excited to continue taking photos on at Belle isle.
Once on the island, it took me a hot minute to scope out my subjects. And when I did, my little Sony preformed magically. It rekindled my dwindling passion I once had with photography when I first began. I found myself wanting to shoot anything and everything. One subject after another, I stop, half ass park my car, rapidly compose and shoot then hop back in to warm up and chimp. After about an hour or so, that star of ours was well on its daily journey to the horizon and it was time to make my way back to Southfield.
After a few stops to get groceries, I made it back to my apartment safe and sound. And once I got my food put away it was time to see how I did with my little Sony. The images straight from the camera are amazing. Sharp details and rich colors. And no, I did not bump up the saturation or add any vibrant in post. (Only minor exposure adjustments and resized them). I was a little leery about the touch screen and using it to select what I wanted to be in focus. But the more I used it, it quickly became second nature and thoughtless to use. The only issue with my new Sony is that it didn’t come with some type of lanyard or hand strap. But a quick search on Amazon took care of that.
All in all, I’m really excited about my new ZV-1 and the rekindling of my passion for photography. I can’t wait for the United States to get its shit together and get healthy so I can safely travel again and experience new adventures.
Stay safe and keep busy,
Steven
If you like what you see and read here, click the “Like” button! Along with feel free to leave a reply below or start to follow my blog.
Ever since my love affair with photography began, I’ve noticed the images from seasoned photographers had a uniform look and feeling to them. And I wanted to do the same with my images. I figured they had a system or a process of their own to achieve such a look. As a result of that thinking, I started developing a shooting routine to aid in capturing a consistent look to my images. “Shooting routine? What’s that? I define it as a checklist of things to do to help you see the image and think about how to capture it before you take the shot. Thing such as which body and lense to use, to shoot it landscape or portrait, how is your depth of field along with many others. After years of try, fail, learn and repeat; I’ve come to trust my routine. It has become something I do instinctively. I’d like to share it in action at my favorite place in Detroit, the conservatory on Belle isle.
I start my routine by walking from room to room, camera still tucked away, curiously seeking out subjects of interest. All the while keeping mental notes on what’s catching my eye. After I’ve made a complete lap of the conservatory, it’s time to get the camera out and revisit those areas of interest. As I approach my subject, I choose what lens I’m going to use and closely study it. Trying to sort out what is catching my eye and where are the edges of my shot. Next, I either stand or setup my tripod in the location where I want to create my image. As I Look through the viewfinder, I ask myself a series of questions.
Where do I want my subject?
Will it be a landscape or portrait shot?
How large or shallow do I want my depth of field?
Is there anything in the foreground and or background that would be distracting to the viewer eyes?
What’s in the light and what’s in shadow?
If I’m satisfied with my answers to my questions, I’ll then take the shot. After the exposure, I will review the shot to see if it matches the image in my mind’s eye. If not, I’ll ask myself “What must I do to match the shot in my head?” Do I need to get closer or farther away? Larger or smaller aperture? Or do I need to completely recompose the shot? After doing whatever necessary changes, I’ll reshoot and review. And will repeat this cycle until I feel I’ve captured the image I was looking for. Sometimes I’ll walk the route in reverse. For a different point of view. If I find something interesting, I’ll go through the same steps to capture the shot.
As I said earlier, I’ve come to trust and rely on my routine to capture images. It helps me shoot with intent and allows my creative eye to be my guide and not my impatience. It has also help me develop my sense of aesthetics and focused in on what has caught my attention. There are times where I cannot use my routine and I’m forced to improvise. For example, while doing my research on Antelope canyon, I found out the guided tour moves in one direction and you pass through it only once. And with the amount of money I spent on hotel, rental car and airfare, I wanted more than one chance to capture the fluid like sandstone and sharp contrasting desert light. So, I scheduled two tours to double my chances to shoot successfully. You can see the results of that adventure here, Antelope Canyon 2.0.
Something else that help me develop my shooting routine was when I lived in downtown Detroit. I had a habit of walking around the city with my headphones in and actively looking for images. I did it as often as I could and at every hour of the day. And during all four seasons including winter until it was too cold to walk around. I would pick out a certain area of the city and would crisscross the area searching for compelling subjects. I would frequently walk the same block, from every possible direction. Continuously taking notes on what’s in the light and shadows as well as what time of day it is. Was it going to be a morning, midday or afternoon shot? Would it be a wide or narrow field of view? And when I felt the time was right, I would head out with my camera and capture the shot I had found. I have very clear and fond memories of each of those images. During that time, I not only explored Detroit, I began to understand the importance of going and looking for a shots along with having a shooting routine. It took me years to develop it and I’m always willing to improve upon it. But it’s “My Routine” and it may not work well for you. It’s up to you to come up with or piece together a routine that works well with your style of shooting.
For me and my photography, having a shooting routine is a healthy practice to have. It has become an unconscious habit with a cadence that is unique to my shooting style. Stopping me from becoming impatient and helps focus my creative eye to capture more exciting images.


")
")
")
")


