As a consequence of my continuing spiritual journey, I feel compelled to question my love for things. Hopefully, this series will unearth some of the mysteries of my love affairs with a few simple questions.
Part Two: Photography
Why do you Love Photography?
For over 20 years, I’ve been deeply infatuated with the art of visual storytelling. The creating of images that tells a story along with being appealing and interesting. Since I started this love affair, I’ve been trying to capture such a set of images. A unique portfolio that would be ridiculously hard, extremely expensive, or impossible to duplicate. As pretentious as that sounds, it’s something that I feel compelled to work towards. But unfortunately, I can not say all of my images fall into that precise definition. I have come to accept it’s about enjoying the photographic journey and not its destination
When and why did it start?
It started back in the mid nineties after seeing a striking sunset image that my sister took. I remember the vibrant colors contrasted by the dark silhouettes of trees drawing my eye deeper and deeper into the image. This not only sparked my curiosity but also inspired me to pursue my own photographic passion. But it wasn’t until years later when I was somewhat financially stable before I started my love affair with photography. It was 2004 when I got my first DSLR and was so enthusiastic, taking pictures of anything and everything. I remember being so eager to learn as much as I could. I would hang out in the photography section of bookstores, being a sponge soaking up as much information as I could. Along with spending countless hours online browsing various photography websites and forums. Searching through pages and posts for any knowledge I thought was relevant and helpful to my development as a photographer.
How does it make you feel?
Like with anything that I love, photography brings me an abundance of joy and adds a considerable amount of meaning to my life. It hits differently than my love of aviation but it’s in the same emotional space. There’s a childish level of excitement I get every time I peek through my viewfinder. I’ve never had a bad experience behind my camera. That’s not to say I don’t bitch up shots. (Which I still do 🙂). But there’s a powerful attraction to photography that pulls me in. There have been many times, out of nowhere that I’ve felt the urge to do some photography. And without hesitation, I’ll get my gear and head out. I’ve come to realize that capturing photos is just a part of who I am.
What do you do to maintain and nurture your love for Photography?
After 20 years, I’m still willing and open to learning something new about my passion. If it is new processing software, shooting techniques or even a new camera system, the drive is still there. Along with my daily routine of scrolling through Flickr to see what other photographers are shooting. Doing so keeps my creative vision fresh and flexible to help me envision new images. Moreover, I’ve developed a shooting routine that keeps me disciplined and focused so I can “Shoot with intent” and not just aimlessly wonder around and take pictures. Nurturing and growing my passion for photography is a lifelong journey.
What do you love about photography most? And why
I love the rhythm of envisioning an idea for a photo, chasing after it for days and some cases years, then actually capturing it and then sharing it with others. Some ideas are crystal clear, where I know exactly what the final image will look like. Others are more abstract, and the outcomes are unknown until the moment I press the shutter. Its creating images (for my blog, posting on social media, or photos of my models) that deeply resonate with people that makes the challenge worth it.
To see my growing collection of photos, follow the link below
As a consequence of my continuing spiritual journey, I feel compelled to question the things I love. Hopefully, this series will unearth some of the mysteries of my love affairs with a few simple questions.
Part One: Aviation
Why Do You Love Aviation?
The saying “You can’t explain what’ love is. But you feel it clearly, completely and deeply when you are”, best describes my feelings for aviation. I maintain a child-like enthusiasm and passionate desire for all things aviation-related. It is one of a few things that fulfill me intellectually, emotionally, spiritually, and lovingly. Asking me to give up Aviation would be no different than asking me to cut off an appendage. Aviation is a part of who I am and my love for it has never wavered. I can’t remember a time when I didn’t love it. And am always delighted by new aspects of aviation that I have never experienced. Such as my current infatuation with seaplanes and helicopters.
When and why did it start?
My first memory of my love for aviation started when I was very young, I was maybe 6 or 7. My dad was in the Navy, and we were stationed at Roosevelt Roads Naval Station in Puerto Rico. One day, my dad took me to an area where he works and there was a room that the ceiling was covered with model airplanes. Which was something I’d never seen before, but I remember being absolutely fascinated by all the different types and wanted to know each of their names. It was about that time I also noticed that our house was parallel to the flight path to the air base. There were no ships based in Roosevelt Roads but when a aircraft carrier was in the area, its air wing would visit the base. It was the coolest place to grow up, seeing Tomcats, Intruders, A-7s, and S-3s enter the pattern, break information, and then drop gear on the downwind leg. It is the cause of me being easily distracted by flying airplanes. I remember it came to a point where could tell what type of plane it was just by its sound. After 3 or 4 years, we moved to the Tidewater area of Virginia. And being in the vicinity of numerous airbases, there was no shortage of military aircraft flying overhead for me to identify.
How does aviation make you feel?
Aviation has always been a constant source of wonder and thrill in my life, and it has never once let me down. The passion I felt when I first fell in love with aviation is still just as vigorous today, filling me with the same level of uninhibited joy and excitement. Over the years, my connection to various aspects of aviation has deepened, evoking a variety of emotions depending on the context. For instance, vintage warbirds often stir up a sense of nostalgia, of a time when these iconic aircraft were built and flown by hand and not by a computer. Helicopters, on the other hand, ignite my adventurous spirit, with their unique ability to hover and access remote locations. Meanwhile, a window seat of an airliner brings me an unequal sense of peace and calm, as I gaze out over the endless expanse of sky and watch the world pass below.
What do you do to maintain and nurture your Love for Aviation?
Like with anything I love, the maintenance and nurturing are done effortlessly and enthusiastically. From attending aviation events, visiting museums, plane spotting, and watching spotting channels on YouTube (yes, it’s a thing) to planning trips to explore and experience various new aviation events. (Cough) My trip to England 🙂 Yeah, my aviation checklist from that trip. Got to fly on an Airbus A330-200, did my first air-to-air photoshoot with WWII Warbirds over the English countryside, countless spotting trips to London-Heathrow drove 2 and a half hours to see TSR.2, did a helicopter flight over London, then spent 5 days at the world’s largest military airshow. I will shoehorn aviation into any conversation whenever possible along with spending countless hours on Flightradar 24. Driving around any airport with airplanes taking off or landing in view is troublesome for me. The need to see and identify what’s taxing to the runway, taking off, or landing is way too distracting.
What do you love about it most? And why
Whether it is in an airliner, helicopter, or hanging out the back of a Skyvan, for me going flying is by far the most enjoyable way to experience aviation. The thrill and power of takeoff always gives me chill bumps. There is something not only liberating and peaceful about glaring out the window, watching the world and clouds pass by.
I came across this quote about valuable things on Instagram that resonates with me. “Things that fulfills you intelligently, emotionally, spiritually, and lovingly.” Since I’ve heard this, everything that does not fit into one of these categories feels more like an unsatisfying routine or chore. But it does shine a refreshing light on what’s important to me. And because of this newfound knowledge, I now have a new sense of meaningful purpose and a lasting peace of mind I have been lacking and seeking for so long. So, what do I Value?
My Time
Time is my most valuable nonrenewable resource. Once it is gone, I will never get it back. And to say, “I fucking hate wasting it is a huge understatement.” The simplest way I can define using one’s time is to dedicate it to a purpose. Ideally doing something that you find meaningful and enjoyable. Not every purpose is going to be fun and exciting, such as doing chores or running errands but are at least productive. Boredom is powerless over you when you wisely choose how to use your time. Fortunately, I learned long ago how to occupy my time purposefully and creatively. Such as working on my various projects and hobbies, learning something new from listening to audiobooks and insightful podcasts, and connecting with friends. I can’t think of a truer statement than that time flies when you are having fun.
My Solitude
The world has always been and will always be shit. But my solitude offers me a brief but refreshing escape from it. Where I can go untouched by its ever-present madness and constant distracting noise. My mind becomes quiet and still, allowing me to recenter on what is important to me. Such as my creativity gets a chance to re-energize and is free to run wild. In my solitude, time dilates making hours seem like days. Making a weekend feel more like 3 days and 4 if I’m lucky. I can recall a time in my life when my mind was so loud and constantly fixated on meaningless things that silence was rare and foreign to me. Now I’m able to appreciate the rejuvenating and calming nature of silence.
My Peace of Mind
I can’t talk about solitude without mentioning mental health. The cultural definition of happiness that is constantly being marketed and promoted is bullshit to me. That fantasy state of perpetual joy and lasting fulfillment, I feel is out of touch with reality and is unreachable. But if I replace happiness with peace of mind, that’s far more realistic and obtainable. The cheat code for managing and maintaining any kind of good mental health is knowing what your triggers are and having the tools to healthfully cope with them. Such as meditating, journaling, reading, exercising or practicing your spiritual and or religious beliefs. Whatever calms your mind and brings you clarity. If you have the means, find and talk to a trained professional. Life is too short to constantly have a noisy and cluttered mind.
My Creativity/Passions
I can best describe my creativity and passion by, it’s a fire that burns in my spirit. When it is lit, I can tell you what color the flames are along with how hot they are. Doubt and frustration can quickly snuff out its flame. But I love feeding it and enjoying its heat. I must be careful and not put too much fuel into the fire. When I do, I start to neglect other parts of my life. And finding that balance is crucial for me to have that life I love and enjoy. Writing, photography, and building scale models are my current passions.
My writing has become one of the most powerful ways for me to connect with myself and the world around me. It’s more than just putting words on a page; it’s a process of discovery and expression that challenges me to think deeply, confront my thoughts, and articulate ideas to share with others. Finding my writing style has been a challenging journey in itself, one that’s both intellectually demanding and rewarding. For me, writing is a creative outlet that allows me to share my passions, perspectives, and inner world to life in a way different from my other passions. Writing has taught me patience, persistence, and the importance of embracing imperfection—it’s a journey I’m grateful to be on and a passion I must continue to nurture.
My photography is the most cherished of my passions. I’ve never had a bad time behind my camera. Not to say, I don’t bitch up shots. (Which I still do 🙂) But even after nearly 20 years, I’m still deeply in love with the art of visual storytelling. I’ve been trying to capture a collection of images that are unique to me since I started this love affair. A portfolio of photos that tells a story of some sort that would be very hard, very expensive, or impossible to duplicate. As pretentious as that sounds, it’s something that I feel compelled to work towards. And not all my photos that I share fall into that precise definition. It’s about enjoying the photographic journey and not its destination. Look here to view My Photography.
My scale model building is my oldest creative passion. I started building models as a kid because there weren’t any toys of the airplanes that I wanted to play with. As I grew older, I built for model competitions. But after years of doing the necessary research and the tedious nature of correcting kits, I lost interest and didn’t build anything for years. While away in college, I studied industrial design focusing on model making. There I was exposed to a tremendous amount of new building techniques and materials that propelled my building creativity into a new level. After graduation and starting my new career, it was about 8 years before I felt the urge to build anything again. But I gave myself two conditions about getting back into the hobby. First, I wasn’t going to build anything real. My builds are 100% fantasy but deeply rooted in reality. And second, I was only going to build when I feel like building and not whenever I had the time. I’ve found working on projects while not inspired, leads to disappointment and frustration. Look here to see My Modeling Madness.
My Adventures
“I thought I wanted a rewarding career. But come to find out, all I wanted was a paycheck to pay for plane tickets!” Each adventure, whether it’s a short road trip or a journey halfway across the world, offers the thrill of discovery and the chance to step into the unknown. There’s nothing quite like wandering the streets of Tokyo, observing the pulse of life in a city that never seems to sleep, or plane spotting from a helicopter over LAX, photographing the world from a new perspective. Some of my most memorable moments come from these unique, sometimes one of a kind experiences—like hanging out of the back of a Sky Van, photographing warbirds over the countryside of England.
These adventures aren’t just about seeing new places; they’re about capturing memories that can’t be recreated and moments that feel like they belong only to me. I love collecting souvenirs like refrigerator magnets and Starbucks mugs from each place I visit, little reminders of those incredible moments. Traveling reminds me of the importance of living fully and embracing the unexpected. Even though I don’t get to explore as often as I’d like, each trip enriches my life, fuels my creativity, and reminds me that there’s always more to see and learn in the world. Head over here to see “My Adventures”
My Music
Music is comfort food for the soul and a playlist that can drive your mindset. Music that resonates with your spirit and is joyous to your heart. Music that ignites your imagination where you are free to explore new ideas. Listening to music due to mood and or when trying to alter it to be a better place. Also, to drown out the stupid, the condescending, the incompetent and the entitled. Heck, sometimes I have to drown out my own irrational and destructive thoughts to maintain my peace of mind. It should be noted that music can also be harmful to your wellbeing. Just like coffee, it can amp you up especially when it’s not needed. But being in tuned with one’s emotions can helped you weed out and remove music that is toxic to your mindset.
My Friendships
“People are like books. Some deceive you with their covers and others surprise you with their content.” And I love my friend’s content which are beautiful with their own unique flavor, seasoned with the ups and downs of life. Unapologetic about who they are and the lifestyle they choose to live, and a creative couple that make relationships look easy with their loving understanding and gentle support for each other. Making tacos together, taking road trips and especially when I have to draw 15 while playing Uno, my friends truly mean the world to me. Friends that won’t co-signed my bullshit, who genuinely cares about each other’s feelings and wellbeing. Who you choose to surround yourself with plays a substantial influence in the quality of your life.
In embracing these values—time, solitude, peace of mind, creativity, adventure, music, and friendships—I’ve come to realize that a fulfilled life is one built on intentional choices and meaningful connections. Each of these elements shapes my days, grounds my purpose, and brings a sense of calm and clarity. By focusing on what truly matters and letting go of what doesn’t align to me, I’ve found a path that feels both authentic and rewarding. Life is hard and its difficulties will never go away. But living with this newfound awareness has given me a peace of mind, reminding me daily of the beauty in a life guided by purpose and passion.
We have all seen crappy photos of breathtaking models and wished they put the same effort in taking photos as they did in to building their masterpieces. From poorly lit images, distracting backgrounds to badly composed shots. Photographing scale models is essentially Macro photography. Which requires having an understanding of how to control your depth of field while shooting close to your subject. And like every creative craft, photography is a learned skill. I’m going to share my process of photographing models that I’ve used over the years that may help you get better results photographing your models using a DSLR or a point & shoot camera. It doesn’t matter what scale you build or if you build cars, armor, ships or aircraft, all the techniques are going to work the same.
Disclaimer: This tutorial is not the only way to photograph scale models. This may or may not work well with you.
There are three things I want to clarify before we get started. First, this tutorial will focus on giving you a better understanding of the photo process, it is not to speed it up. As well as this is not for someone who is submitting images to a publication. This is to help the everyday modeler take better photographs of his or her models to share online.
Another thing is the time frame of photographing your model. This is not a 5 minute job. Just like building models, If you rush it your results will be shit. You’re going to have to take your time with this process. It could be two or three hours.
And the last point is cost. This is not a cheap and easy way to photograph your models. Nor is it going to be expensive. But there will be a few items you will need if you’re to complete this tutorial.
Let’s start with a brief discussion about the pros and cons of DSLR’s, point & shoot cameras and why not to use your mobile device. Some types of cameras outperform others and the old saying “You get what you pay for” holds true in photography. But if you know your camera’s limitations and work within them, you can capture some quality images.
Digital single lens reflex (DSLR) and Mirrorless DSLR offers the greatest control over the look of your photos along with having better image quality. They have the ability to switch lenses unlike point and shoot cameras. But it comes with a steep price and a higher learning curve.
Point & shoot cameras(P&S)are compact and user-friendly cameras. They offer similar features like their more expensive siblings. But have simplified controls along with the inability to change lenses.
Mobile devices have come a long way from a few years ago but the major drawback is that they lack control. You can not select your aperture, shutter speed, ISO… anything to control the look of your image.
But before we continue, there are some basic photography terminology you must know and understand. Don’t be intimidated with these new terms, it’s just part of the learning process.
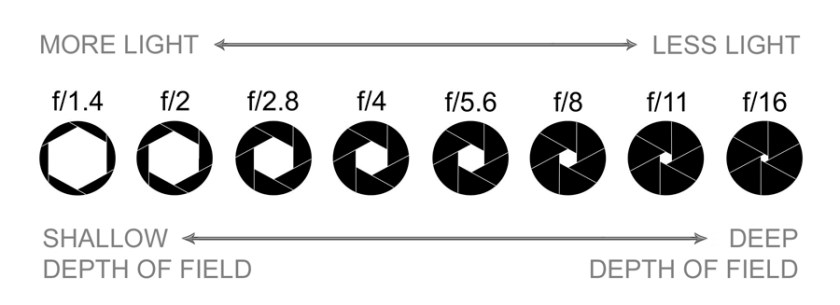
Aperture is the opening in the lens that lets light pass through and enter the camera. It is measured in f-stops. Here’s where it gets weird, the larger the f-stop, the smaller the number. For example, f/1.8 is a large f-stop and f/22 is a small one. The aperture also controls the depth of field in your image. More about that below.
Shutter allows light to pass through the lens in a time frame. Shutter speeds are measured in fractions of a second. Example, 1/500th, 1/400th, 1/320th.
ISO is how sensitive your camera’s sensor is to light. For example, an ISO of 100 means the sensor isn’t very sensitive. And at ISO 3200 is more sensitive. The trade off is at high ISO the grainier the image.
Depth of Field (DOF) is the area in front and behind the focal point that’s in focus. Controlled by the aperture, the larger the f-stop like F/2.8, the shallower your DOF. And with a smaller f-stop like F/11, the larger your DOF. And the closer you are to your subject, your DOF gets compressed. Meaning if you focused on something about 12 inches away @ f/2.8, your DOF will be very shallow, like an inch or less. But if you focused on something 100 ft away, your DOF will be measured in feet and not inches.
Exposure is simply how light or dark your image is. Which is determine by a combination of aperture, shutter and ISO.
Exposure Compensation allows you to override the exposure selected by the camera’s light meter, in order to darken or brighten your image. Have you ever taken a picture of something and the photo turned out too dark or light? It’s because the cameras light meter sees things differently then we do. For example, if you focus on something that is white, the camera sees it as super bright and wants to select the fastest shutter speed it can. Resulting in an underexposed image that is dark overall. This is due to there was not enough light getting to the sensor during the extremely short time the shutter was open. And the opposite happens with dark subjects, the camera wants to select a longer shutter speed. Making the image look too bright and washed out due to too much light reaching the sensor.
Below is an example of using exposure compensation. The first image was shot with no compensation and looks a bit dark. The second is a full stop under(-1) which is way too dark. And the last is a full stop over(+1).
no compensation
-1 stop
+1 stop
White Balance is the color temperature in your image. Setting it can be frustrating and tricky. Even I, a seasoned photographer doesn’t like playing around with it.
Auto focus points: Your camera has multiple auto focus points to select what is to be in focus. If you’re using a DSLR or P&S camera, you’re going to have to know how to select and change the auto focus points. Look in your camera’s manual to learn how. And if you don’t have or lost it, check Google for an online manual.
File type: For sharing images on social media and various online sites, you do not need the complexity of shooting and processing a RAW file. For this tutorial as well as to simplify things, Jpeg will do fine.
If you’re new to photography, I know that this is a lot to digest. But the more you know and understand the terminology associated with photography, the better off you will be. There are a bunch of informative sites out there to further help your understanding. Remember, Google and YouTube are your know it all friends.
Let’s get into what you’re going to need for your photo shoot.
Camera: If you have a DSLR, Mirrorless DSLR or a point and shoot, the process are pretty much the same. Don’t try this with your mobile device.
My Sony ZV-1
My Canon 7D MKII with 17-85mm and 100mm Macro
Lense: You don’t need a super expensive lense to photograph scale models. Most kit lenses that comes with DSLRs will do fine. You don’t want to use a wide angle lense because they tend to distort the perspective and produce unnatural looking images.
Tripod: If you don’t have one, it’s time to get one. They come in all shapes and sizes. Search your favorite online store for “small tripod” and find one that is in your price range. My only advice is don’t get a flexible/bendable leg tripod. The ones that look like insect legs.
Backgrounds: Just like your kits, don’t be cheap. Do not use a bed sheet, driveway or sidewalk. What you want is a smooth seamless solid color material that is larger than your model. Preferably neutral colors such as tans and grays.
Canson Mi-Teintes Art paper
I have two different methods for setting up backgrounds. The simpler way is to use any large flat surface. Such as a big piece of foam core or a large tabletop so when I zoom in and tilt my camera downwards, it fills the frame. This does require more space but it’s super easy. The only drawback is you can only shoot the model so low before you start to reveal the lack of a vertical background. But you can get around this by having a solid color surface such as a wall close to it.
Set up one
Shot from set up one
shooting low in set up one
image from shooting low in set up one
The other method uses a wall to hold up your background with a few pieces of tape. Let whatever material you’re using naturally curve from the wall to the surface your model is on. This will create a seamless and clutter free backdrop behind your model. This setup allows you to place your camera as low as you want.
Set up two
Image from Set up two
Shutter Release: An essential tool to remotely fire the shutter without touching or disturbing the camera.
Self-Timer function: If you don’t have a shutter release, the self timer is the next best thing. Most DSLRs and P&S cameras have some form of a timer feature. Turn to your manual to how to access it.
Photo editing software: If it’s Photoshop, Lightroom, GIMP or whatever program, you should have a basic understanding of the program to edit your images. I suggest searching on Google and YouTube to find informative tutorials. If you do not have any editing software, look here for an available free program.
Another editing option is to do it on a tablet or iPad. Adobe Lightroom is available on iPad as well as Photoshop Express Photo Editor.
Now that we gone over some new vocabulary along with gathering our photographic supplies, it’s time to shoot right?! Not yet. Before we start taking pictures, we must set up the photo shoot.
Photo shoot setup
You probably noticed that “lighting” is not included in the list of things needed. This is because the Sun will provide all the light you will need. Moreover, using sunlight as our light source means we do not have to deal with setting up multiple light sources. I suggest shooting on a sunny day over a cloudy one. Also, using the Sun as our light source make selecting our white balance simple.
We are going to set up our photo shoot near or in front of a window but not in direct sunlight. Shooting in direct sunlight will cause the highlights on your model to be too bright along with the shadows too dark. I often set up my photo shoot on a wall that is 90 degrees from the light source window. I’ll use a large table and sometimes even use the floor for my shooting area. Make sure you have plenty of space to move your model in various positions along with room to move your camera around the photo shoot.
As I discussed earlier, I have two ways to set up backgrounds. Whatever method you’re going to use, make sure it’s larger than your model so that it fills the frame. It’s time to move on to setting up the camera.
Camera setting
Firmly attach your camera to your tripod.
Turn ON your camera.
Take lens cap OFF.
Make sure auto focus is ON.
Turn the flash OFF. There is no need to introduce a new light source. Plus, using the flash at such close range, will produce harsh, unnatural and distracting shadows.
Plug in shutter release or switch to timer.
Select “Aperture priority”. On most cameras it is labeled “A” or “AV”. Then select a F-stop somewhere in between f/10 to f/22. I can’t tell you the perfect F-stop that will have the best depth of field for your model. You’re going to have to shoot, check your depth of field and adjust accordingly. If your depth of field is too shallow, change it to a smaller F-stop (larger number), reshoot and review.
Select an ISO in between 100 and 200 to reduce the digital noise.
If your P&S has a Macro setting, make sure to switch to it.
Set your White balance to “Auto” or “Sunny”.
File type, Select the largest and finest Jpeg.
Now that we have our background and camera set up, now it’s time to start taking pictures. It’s not as simple as placing your model in front of the background and start snapping photos. There are a few things we must consider as we take photos.
Photo process
• While looking through the viewfinder or rear display screen, look around the model to make sure the background fills the frame. Make sure all you see is the background color.
• Select and change the auto focus point to the most logical area of interest on the model. Such as the cockpit of an aircraft, the turret of a tank, the bridge of a ship, eyes of a figure…
• While the shutter is open, do not touch the camera, tripod or the table your model is on to ensure it remains completely motionless. The shutter is going to be long. Don’t worry. This is not action photography with lightning fast shutter speeds. Let the camera do its thing and wait to see the results.
• After the shutter closes, review the image. Is the image in focus and sharp? If not, reshoot it and make sure you don’t move the camera, tripod or your model.
• Is the depth of field covering the whole model? If not, change to a smaller F-stop (larger number)
• When you’re reviewing the image on the rear LCD screen, ask yourself “Do I like this shot?” If not, recompose and reshoot until you’re happy. Remember, the number of photos you can take is only limited to the size of your memory card. So, take as many as you like.
• If your image is too dark, you’re going to want to overcompensate to get a proper exposure. Start at +1/3, shoot and review. If it’s still dark, compensate some more until it looks right. And do the opposite when your image is too light.
Basic shots
If you struggle with the artistic part of photography, don’t stress. Let’s go over a few basic shots to help you show off your model. Here’s a few shots to try.
Three quarter front
Three quarter rear
Sides
Underside
Three-quarter front
Three-quarter rear
Side view
Bottom
Don’t be afraid to play around and try something different. Move around the model and when you see something that catches your eye, place your camera in the same location as where you saw it and take a picture. Review the image to see if it matches the image in your minds eye. If not, zoom in or out, get higher or lower, move left or right… shoot and review until you feel you got the shot you were looking for.
Detail shots
With the basic shots out of the way, it’s time to capture all those wonderful little details. Something you should be aware of for both DSLRs and P&S cameras, are focus limits. All lenses have a minimum distance it can focus in on something. Meaning if you’re too close to your model and try to focus the lens, the auto focus will hunt around and not “lock on”. If this happens, just move the camera a couple of inches away from your model and retry. Here’s a few ideas for detail shots.
Weapons
Wheels and landing gear
Head and taillights
Flight controls
Intakes, engines and nozzles
Cockpit of aircraft, bridge of a ship, turret of a tank, face of a figure, grill of a car…
Panel lines and markings
Keep your background and model in place while you review your photos. So, if there is a photo that didn’t turn out the way you liked, you can easily reshoot it. While reviewing your images, check the depth of field, sharpness of the photo and overall aesthetics. Once you’re happy with your images, take down your background and put your model away.
Sorting your images to share
Now that your photo shoot is over, it’s time to download your images to your PC or whatever device you’re going to use to edit them. Selecting what images to share and what not to share can be frustrating. You want to select photos that highlight the features of your model. Maybe it’s the paint job or weathering, some custom or scratch-built item. It’s those things you want to concentrate on. And on the flip side of that, you don’t want to flood your viewers with a ton images that’s very similar. It’s a balancing act for sure. Below is a link to my sorting process which I developed over the years and can help you with the pain of sorting.
Post process is where we are going to edit our images with photo editing software. If it’s photoshop, Lightroom or even GIMP, the task should be the same. How you achieve them will vary from program to program. Removing dust spots, leveling the image, adjusting exposure, resizing and resharpening are the things you want to accomplish. If you do not know how to do these tasks, again Google and YouTube are your know it all friends.
Again, this is not the only way to photograph scale models. This is just a process I’ve developed and use successfully for years. And you can see my results on my website. Every image was shot using this natural light process. Remember, have fun and keep learning new stuff about photography and your gear.


")
")
")
")


