Since I rekindled my love of photography, I’ve discovered it has an all too familiar rhythm. One that has been secretly and deeply embedding itself into my photography over the years but has just lately moved into the light of my passion. Looking back, this unrevealed rhythm has been consistently setting the cadence of creativity and exploration in my imagery. This rhythm I’ve been subconsciously marching to for years has been a driving force behind many aspects of my philosophy of creating unique images. And has spawned numerous adventures as a result along with a multitude of blog posts. This newly unearthed rhythm has 5 key notes starting with Envision, Chase, Capture,Process,and ends with Share. Let’s take a further dive into each.
Envision
It starts with envisioning an idea and setting it as a goal for yourself. It can be as simple as “I want to take some photos of flowers.” Or as complex as “I want to capture the USN Blue Angels sneak pass with a full vapor cone.” It truly doesn’t matter what your subject is or how grand of an idea it is either. You just need to have some direction, just a hint of a loose idea. Whatever you decide, don’t think that it has to be clearly defined with every detail known. Maybe you’re going on holiday, and you want to show a sense of location, or you are trying your eye in a different genre of photography. As long as you are not aimlessly searching for that “Great Shot”. I firmly believe that “Great Shots” begins with an inspiring idea from a creative standpoint and does not just happen. Don’t get it twisted, I’m not saying spontaneity hasn’t produced any mind-blowing images, because it has. But you shouldn’t expect Lady Luck to be waving her magic wand in your direction every time you push the shutter. It’s unrealistic and your results amounts to a waste of time.
Chase
That old saying “Knowing is half the battle” is relevant when it comes to chasing down your images. The knowledge of where and when your subject is available is tremendous. Attributes such as the time of day and or season you want to capture your idea. How you want to light your subject. How often is your subject available and how long will it be around? And being patient with Mother Nature because she loves to start tripping when you need her to behave. Chasing the image in your mind’s eye could take hours, days, or even years to capture. It’s paramount that you don’t lose sight of what you’re trying to accomplish. And it will test your resolve. Having a plentiful supply of vigilance along with an abundance of patience will aid you in mastering the chase. Remember, you will miss every shot you don’t take.
Capture
When the time comes and you see your image about to come to fruition, you must possess a healthy working knowledge of your gear along with an adequate understanding of exposure and composition. Knowing how to change your shutter speed, depth of field, focus point, or any other function without having to look and figure out what button does what. Developing that level of muscle memory only comes with time and experience behind your camera. How you’re going to capture the moment is just as important. What equipment along with what settings to use to successfully capture your idea. Will it require the use of a monopole or tripod, single shot, or continuous shooting to get the best results? Timing is a key factor as well. What amount of time do you have with your subject? You may be attending a multi-day event or just have a half hour with your subject. Regardless, you must make the best use of whatever time is available. Most importantly, how are you feeling? Even the slightest symptom such as headache, congestion, or fatigue can affect how focused you are on your task. Take care of yourself before heading out.
Process
Having an effective post-process routine is necessary for refining your digital images. Knowledge of your post-processing software is crucial, and YouTube, as well as Google, are helpful resources. Whatever software you have, you should know how to import and export your files, maintain a competent understanding of the tools, be able to adjust the exposure, modify the white balance, level the horizon of your photo, and the list of edits goes on and on. A frequently overlooked aspect of post-processing is sorting. Finding that adequate set of images that perfectly expresses your vision. Because the quickest way to lose your viewer’s attention is to show them multiple pictures of the same subject that visually has little to no difference from one another. Finally, file format and location of files are essential as well. Not every platform can recognize the variety of file formats from the multitude of programs.
Share
How you share your imagery along with who you share it with, is equally important. Receiving and learning from non-bias advice is fundamental for us to grow in life as well as with photography. Unfortunately, that doesn’t include family and friends. We all need someone who can offer us honest feedback and not give us sugarcoated responses. And the truth hurts sometimes. But that’s ok as long as we learn something useful from our experiences. On to how you share your photos. Sharing on dead platforms and oversaturated sites is not beneficial for growing your audience and gaining exposure. Knowing how to promote one’s images is not easy and doesn’t happen overnight. This too requires patience and consistency. With the numerous social media platforms, online forums to local photo clubs, there are countless ways to showcase your work and gain exposure.
This rhythm has been a major factor in my growth as a photographer. Relentlessly, pushing me further out of my comfort zone. It’s responsible for developing healthy photographic habits such as coming up with a shooting routine and help with the tedious task of image sorting. Not only has it altered my approach, but it continues to steer my journey into photography to this day. Time and time again, this seasoned rhythm has not failed me in any of my photographic ambitions. If you have been following this blog and reading my posts for any amount of time, you can see all the telltale signs of this rhythm. A prime example is Part Three of my “The Story Behind an Image” series. Where I share how I shot “My 11 Year and 16 Aviation Event Shot”. Each part of this rhythm is clearly shown from beginning to end. And I posted it back in June of 2017, 6 years before I wrote this post.
Since I returned to spotting around DTW, I’ve been shooting from the parking lot of the Marriott Hotel off Wick Road. It’s a well-known and pleasant location for catching arrivals on runway 22 right. But there are two airliners I want to capture that always land on 22 left. The first is Lufthansa 442 from Frankfurt, which is a Boeing 787-9. And the other is Air France 378 out of Paris, she’s an Airbus A350-900. Unfortunately, from the Marriott parking lot, both of these arrivals are just too far away to get a decent shot of. So, I turned to my know-it-all friend, Google. I searched “spotting around DTW” and came across “Spotter guide.net”. To my surprise, I found a location where I could capture arrivals on approach to runway 21 left. From all places, an abandoned gas station at the corner of Middlebelt and Goddard Road.
My Spotting map of DTW
During the extended Easter weekend, I challenged myself to chase these two European girls and get some images of them both. The Lufthansa Dreamliner is going to be first. She’s scheduled to arrive around 1:25pm. During the drive down, was a bit worried about the location. How close is the flight path? Will I get hassled by airport security, local police or some overly nervous passersby? Yes, it happens. I exited I-94 at Middlebelt, headed south and easily found the abandoned station. Was greeted with a good omen, another spotter was already there. I pulled into the derelict station and parked a respectable distance from the spotter so I’m not blocking their view of the flight path. I geared up, camera on, check setting, started up Flightradar24 and start tracking that Lufthansa Dreamliner. I got there about an hour before she was scheduled to arrive. There were a few arrivals before she graced us with her presents. A CRJ, a couple of A320s and a A330 from Amsterdam, all Delta airlines.
It was like a spring southern Californian day in Southeast Michigan, not a cloud in the sky, temperature was in the low 60s and winds were out of the south. As for shooting location, the sun is at your back from sunrise to about 4 or 5ish. By then the sun is parallel to the runway and starts to backlight the arriving flights until sunset. Which I was a bit worried about the lighting conditions for the Air France Airbus. She arrives much later, 6-6:30pm. But soon enough that attractive young lady from Germany was here and I was ready for her. The Canon 90D shutter blasted away like a machine gun as she effortlessly floated through the crystal-clear blue sky.
“The young lady from Germany”
It wasn’t until the following Wednesday that conditions were right for capturing the Air France A350. For her, I busted out my full-frame 50-megapixel Canon 5DSR. Which doesn’t have the advantage of the 1.6 crop factor of the 90D. Which makes my 100-400mm Mk2 when on the 90D into a 160-640mm. As I said earlier, from the abandoned gas station at the time she’s scheduled to arrive, the sun will be on the opposite side of the runway that I’m shooting from and backlighting her as she lands. My plan is to go to the abandoned station about 40 minutes before she arrives and see how the lighting conditions are. If it is manageable, I’ll stay and shoot. But if it sucks, I’ll jump on Google Maps and try to find a place to shoot from with the sun at my back.
I got there early, and the lighting conditions were as I feared, backlit. I shot a few arrivals before jumping into Google Maps. Thankfully, I found a visitor parking lot north of the airport which I would be facing East with the sun behind me but wasn’t sure how close the flight path to 21 left was. With about 20 minutes to spare at the visitor’s lot waiting for the next arriving aircraft. The first thing that passes by is a tiny Embraer Phenom that looks about all of 20 pixels in length through the viewfinder. And my thoughts instantly jumped to do I need to get closer? If so, where can I go? And can I find a new spot before the French A350 gets here? Or do I bite the bullet and go back to the backlit abandoned gas station? FUCK! Thankfully the next three arrivals calmed my racing negative thoughts. A Delta 737, a Frontier A320 Neo and a UPS 757. All filled up the frame more to my liking. Then right on time, that elegant French girl showed up. The 5DSR shoots noticeably slower but I managed to get the shot I was after. I’m going to return with the cropped sensor 90D and see if the extra focal length helps.
We have all seen crappy photos of breathtaking models and wished they put the same effort in taking photos as they did in to building their masterpieces. From poorly lit images, distracting backgrounds to badly composed shots. Photographing scale models is essentially Macro photography. Which requires having an understanding of how to control your depth of field while shooting close to your subject. And like every creative craft, photography is a learned skill. I’m going to share my process of photographing models that I’ve used over the years that may help you get better results photographing your models using a DSLR or a point & shoot camera. It doesn’t matter what scale you build or if you build cars, armor, ships or aircraft, all the techniques are going to work the same.
Disclaimer: This tutorial is not the only way to photograph scale models. This may or may not work well with you.
There are three things I want to clarify before we get started. First, this tutorial will focus on giving you a better understanding of the photo process, it is not to speed it up. As well as this is not for someone who is submitting images to a publication. This is to help the everyday modeler take better photographs of his or her models to share online.
Another thing is the time frame of photographing your model. This is not a 5 minute job. Just like building models, If you rush it your results will be shit. You’re going to have to take your time with this process. It could be two or three hours.
And the last point is cost. This is not a cheap and easy way to photograph your models. Nor is it going to be expensive. But there will be a few items you will need if you’re to complete this tutorial.
Let’s start with a brief discussion about the pros and cons of DSLR’s, point & shoot cameras and why not to use your mobile device. Some types of cameras outperform others and the old saying “You get what you pay for” holds true in photography. But if you know your camera’s limitations and work within them, you can capture some quality images.
Digital single lens reflex (DSLR) and Mirrorless DSLR offers the greatest control over the look of your photos along with having better image quality. They have the ability to switch lenses unlike point and shoot cameras. But it comes with a steep price and a higher learning curve.
Point & shoot cameras(P&S)are compact and user-friendly cameras. They offer similar features like their more expensive siblings. But have simplified controls along with the inability to change lenses.
Mobile devices have come a long way from a few years ago but the major drawback is that they lack control. You can not select your aperture, shutter speed, ISO… anything to control the look of your image.
But before we continue, there are some basic photography terminology you must know and understand. Don’t be intimidated with these new terms, it’s just part of the learning process.
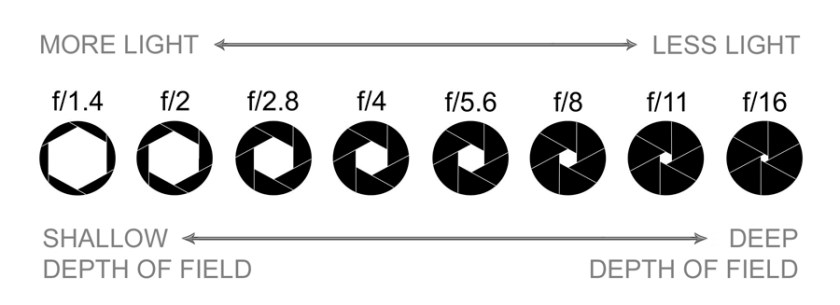
Aperture is the opening in the lens that lets light pass through and enter the camera. It is measured in f-stops. Here’s where it gets weird, the larger the f-stop, the smaller the number. For example, f/1.8 is a large f-stop and f/22 is a small one. The aperture also controls the depth of field in your image. More about that below.
Shutter allows light to pass through the lens in a time frame. Shutter speeds are measured in fractions of a second. Example, 1/500th, 1/400th, 1/320th.
ISO is how sensitive your camera’s sensor is to light. For example, an ISO of 100 means the sensor isn’t very sensitive. And at ISO 3200 is more sensitive. The trade off is at high ISO the grainier the image.
Depth of Field (DOF) is the area in front and behind the focal point that’s in focus. Controlled by the aperture, the larger the f-stop like F/2.8, the shallower your DOF. And with a smaller f-stop like F/11, the larger your DOF. And the closer you are to your subject, your DOF gets compressed. Meaning if you focused on something about 12 inches away @ f/2.8, your DOF will be very shallow, like an inch or less. But if you focused on something 100 ft away, your DOF will be measured in feet and not inches.
Exposure is simply how light or dark your image is. Which is determine by a combination of aperture, shutter and ISO.
Exposure Compensation allows you to override the exposure selected by the camera’s light meter, in order to darken or brighten your image. Have you ever taken a picture of something and the photo turned out too dark or light? It’s because the cameras light meter sees things differently then we do. For example, if you focus on something that is white, the camera sees it as super bright and wants to select the fastest shutter speed it can. Resulting in an underexposed image that is dark overall. This is due to there was not enough light getting to the sensor during the extremely short time the shutter was open. And the opposite happens with dark subjects, the camera wants to select a longer shutter speed. Making the image look too bright and washed out due to too much light reaching the sensor.
Below is an example of using exposure compensation. The first image was shot with no compensation and looks a bit dark. The second is a full stop under(-1) which is way too dark. And the last is a full stop over(+1).
no compensation
-1 stop
+1 stop
White Balance is the color temperature in your image. Setting it can be frustrating and tricky. Even I, a seasoned photographer doesn’t like playing around with it.
Auto focus points: Your camera has multiple auto focus points to select what is to be in focus. If you’re using a DSLR or P&S camera, you’re going to have to know how to select and change the auto focus points. Look in your camera’s manual to learn how. And if you don’t have or lost it, check Google for an online manual.
File type: For sharing images on social media and various online sites, you do not need the complexity of shooting and processing a RAW file. For this tutorial as well as to simplify things, Jpeg will do fine.
If you’re new to photography, I know that this is a lot to digest. But the more you know and understand the terminology associated with photography, the better off you will be. There are a bunch of informative sites out there to further help your understanding. Remember, Google and YouTube are your know it all friends.
Let’s get into what you’re going to need for your photo shoot.
Camera: If you have a DSLR, Mirrorless DSLR or a point and shoot, the process are pretty much the same. Don’t try this with your mobile device.
My Sony ZV-1
My Canon 7D MKII with 17-85mm and 100mm Macro
Lense: You don’t need a super expensive lense to photograph scale models. Most kit lenses that comes with DSLRs will do fine. You don’t want to use a wide angle lense because they tend to distort the perspective and produce unnatural looking images.
Tripod: If you don’t have one, it’s time to get one. They come in all shapes and sizes. Search your favorite online store for “small tripod” and find one that is in your price range. My only advice is don’t get a flexible/bendable leg tripod. The ones that look like insect legs.
Backgrounds: Just like your kits, don’t be cheap. Do not use a bed sheet, driveway or sidewalk. What you want is a smooth seamless solid color material that is larger than your model. Preferably neutral colors such as tans and grays.
Canson Mi-Teintes Art paper
I have two different methods for setting up backgrounds. The simpler way is to use any large flat surface. Such as a big piece of foam core or a large tabletop so when I zoom in and tilt my camera downwards, it fills the frame. This does require more space but it’s super easy. The only drawback is you can only shoot the model so low before you start to reveal the lack of a vertical background. But you can get around this by having a solid color surface such as a wall close to it.
Set up one
Shot from set up one
shooting low in set up one
image from shooting low in set up one
The other method uses a wall to hold up your background with a few pieces of tape. Let whatever material you’re using naturally curve from the wall to the surface your model is on. This will create a seamless and clutter free backdrop behind your model. This setup allows you to place your camera as low as you want.
Set up two
Image from Set up two
Shutter Release: An essential tool to remotely fire the shutter without touching or disturbing the camera.
Self-Timer function: If you don’t have a shutter release, the self timer is the next best thing. Most DSLRs and P&S cameras have some form of a timer feature. Turn to your manual to how to access it.
Photo editing software: If it’s Photoshop, Lightroom, GIMP or whatever program, you should have a basic understanding of the program to edit your images. I suggest searching on Google and YouTube to find informative tutorials. If you do not have any editing software, look here for an available free program.
Another editing option is to do it on a tablet or iPad. Adobe Lightroom is available on iPad as well as Photoshop Express Photo Editor.
Now that we gone over some new vocabulary along with gathering our photographic supplies, it’s time to shoot right?! Not yet. Before we start taking pictures, we must set up the photo shoot.
Photo shoot setup
You probably noticed that “lighting” is not included in the list of things needed. This is because the Sun will provide all the light you will need. Moreover, using sunlight as our light source means we do not have to deal with setting up multiple light sources. I suggest shooting on a sunny day over a cloudy one. Also, using the Sun as our light source make selecting our white balance simple.
We are going to set up our photo shoot near or in front of a window but not in direct sunlight. Shooting in direct sunlight will cause the highlights on your model to be too bright along with the shadows too dark. I often set up my photo shoot on a wall that is 90 degrees from the light source window. I’ll use a large table and sometimes even use the floor for my shooting area. Make sure you have plenty of space to move your model in various positions along with room to move your camera around the photo shoot.
As I discussed earlier, I have two ways to set up backgrounds. Whatever method you’re going to use, make sure it’s larger than your model so that it fills the frame. It’s time to move on to setting up the camera.
Camera setting
Firmly attach your camera to your tripod.
Turn ON your camera.
Take lens cap OFF.
Make sure auto focus is ON.
Turn the flash OFF. There is no need to introduce a new light source. Plus, using the flash at such close range, will produce harsh, unnatural and distracting shadows.
Plug in shutter release or switch to timer.
Select “Aperture priority”. On most cameras it is labeled “A” or “AV”. Then select a F-stop somewhere in between f/10 to f/22. I can’t tell you the perfect F-stop that will have the best depth of field for your model. You’re going to have to shoot, check your depth of field and adjust accordingly. If your depth of field is too shallow, change it to a smaller F-stop (larger number), reshoot and review.
Select an ISO in between 100 and 200 to reduce the digital noise.
If your P&S has a Macro setting, make sure to switch to it.
Set your White balance to “Auto” or “Sunny”.
File type, Select the largest and finest Jpeg.
Now that we have our background and camera set up, now it’s time to start taking pictures. It’s not as simple as placing your model in front of the background and start snapping photos. There are a few things we must consider as we take photos.
Photo process
• While looking through the viewfinder or rear display screen, look around the model to make sure the background fills the frame. Make sure all you see is the background color.
• Select and change the auto focus point to the most logical area of interest on the model. Such as the cockpit of an aircraft, the turret of a tank, the bridge of a ship, eyes of a figure…
• While the shutter is open, do not touch the camera, tripod or the table your model is on to ensure it remains completely motionless. The shutter is going to be long. Don’t worry. This is not action photography with lightning fast shutter speeds. Let the camera do its thing and wait to see the results.
• After the shutter closes, review the image. Is the image in focus and sharp? If not, reshoot it and make sure you don’t move the camera, tripod or your model.
• Is the depth of field covering the whole model? If not, change to a smaller F-stop (larger number)
• When you’re reviewing the image on the rear LCD screen, ask yourself “Do I like this shot?” If not, recompose and reshoot until you’re happy. Remember, the number of photos you can take is only limited to the size of your memory card. So, take as many as you like.
• If your image is too dark, you’re going to want to overcompensate to get a proper exposure. Start at +1/3, shoot and review. If it’s still dark, compensate some more until it looks right. And do the opposite when your image is too light.
Basic shots
If you struggle with the artistic part of photography, don’t stress. Let’s go over a few basic shots to help you show off your model. Here’s a few shots to try.
Three quarter front
Three quarter rear
Sides
Underside
Three-quarter front
Three-quarter rear
Side view
Bottom
Don’t be afraid to play around and try something different. Move around the model and when you see something that catches your eye, place your camera in the same location as where you saw it and take a picture. Review the image to see if it matches the image in your minds eye. If not, zoom in or out, get higher or lower, move left or right… shoot and review until you feel you got the shot you were looking for.
Detail shots
With the basic shots out of the way, it’s time to capture all those wonderful little details. Something you should be aware of for both DSLRs and P&S cameras, are focus limits. All lenses have a minimum distance it can focus in on something. Meaning if you’re too close to your model and try to focus the lens, the auto focus will hunt around and not “lock on”. If this happens, just move the camera a couple of inches away from your model and retry. Here’s a few ideas for detail shots.
Weapons
Wheels and landing gear
Head and taillights
Flight controls
Intakes, engines and nozzles
Cockpit of aircraft, bridge of a ship, turret of a tank, face of a figure, grill of a car…
Panel lines and markings
Keep your background and model in place while you review your photos. So, if there is a photo that didn’t turn out the way you liked, you can easily reshoot it. While reviewing your images, check the depth of field, sharpness of the photo and overall aesthetics. Once you’re happy with your images, take down your background and put your model away.
Sorting your images to share
Now that your photo shoot is over, it’s time to download your images to your PC or whatever device you’re going to use to edit them. Selecting what images to share and what not to share can be frustrating. You want to select photos that highlight the features of your model. Maybe it’s the paint job or weathering, some custom or scratch-built item. It’s those things you want to concentrate on. And on the flip side of that, you don’t want to flood your viewers with a ton images that’s very similar. It’s a balancing act for sure. Below is a link to my sorting process which I developed over the years and can help you with the pain of sorting.
Post process is where we are going to edit our images with photo editing software. If it’s photoshop, Lightroom or even GIMP, the task should be the same. How you achieve them will vary from program to program. Removing dust spots, leveling the image, adjusting exposure, resizing and resharpening are the things you want to accomplish. If you do not know how to do these tasks, again Google and YouTube are your know it all friends.
Again, this is not the only way to photograph scale models. This is just a process I’ve developed and use successfully for years. And you can see my results on my website. Every image was shot using this natural light process. Remember, have fun and keep learning new stuff about photography and your gear.
If you follow my blog, you know I’m always stressing how important it is to know what it is your trying to show before you start shooting. This practice is called shooting with intent. You may ask yourself, “Why is that so important?” For me, it motivates ambition and sparks creativity. Along with allowing your creative eye to be your guide. To shoot with intent means you consider many factors before creating an image. Such as what camera and lense to use, where are the edges of your shot, what auto focus point to use, just to name a few. Putting thought into your photography and not hoping that you’ll “Get lucky” and somehow magically capture the images you want. For me, setting some goals for myself insures I shoot with intent. Let’s talk about goals and how to come up with some of your own.
The only wrong way to come up with goals is to not to have any. It could be as simple as looking for some interesting light or trying some different settings. When it comes to making goals for yourself, you want to state what it is you wish to accomplish, how long you’re giving yourself to do them and ideas on how to meet them. Keep in mind, you’re not writing an essay; simple one liners will do fine. You can keep them on your phone, in a notebook, on the back of a business card, somewhere to keep track of them. And bring them with you every time you venture out. I keep mine on my phone, so I know they’re always with me and I can add to and or edit them wherever I go.
It’s important to be realistic with yourself when making them and that they’re within reach of your skill set. Something that if you push yourself just a bit, you’ll be able to accomplish it. It’s a good idea to set deadlines for them as well. A day, a weekend, a month or a year. Some kind of time frame so you don’t get lazy and procrastinate. The idea is to challenge and expand your creativity, not to overload yourself. If you don’t meet your goals or a deadline passes you by, don’t be hard on yourself. Reset them and try again later. Just don’t give up on them. Follow the links below to see examples of my shooting with intent.
In each instance, I had a clear target to aim for. Some took me longer than others to check off my list, but they kept me focused and actively seeking the images I wanted. It also helped me rediscover my excitement about photography that had been slowly eroding away from doing the same unstimulating routine over and over again. Shooting with intent also help me define my growing style of photography. And after meeting each goal, I have a greater level of satisfaction and fulfillment with my photos. Because of that, I always have a list of ongoing goals to insure I’m shooting with purpose. Here are a few of them.
Finding a unique image
Interesting light and shadows
Sense of speed
Sense of aesthetics
Strong and interesting composition
Adding some type of goals to your routine can be a healthy challenge to motivate your drive and grow your creativity. Something to guide your creative journey through photography and to start to shoot with purpose. I hope this post shed some light on shooting with intent along with encouraged you to set some goals for you and your photography.


")
")
")
")


