We have all seen crappy photos of breathtaking models and wished they put the same effort in taking photos as they did in to building their masterpieces. From poorly lit images, distracting backgrounds to badly composed shots. Photographing scale models is essentially Macro photography. Which requires having an understanding of how to control your depth of field while shooting close to your subject. And like every creative craft, photography is a learned skill. I’m going to share my process of photographing models that I’ve used over the years that may help you get better results photographing your models using a DSLR or a point & shoot camera. It doesn’t matter what scale you build or if you build cars, armor, ships or aircraft, all the techniques are going to work the same.
Disclaimer: This tutorial is not the only way to photograph scale models. This may or may not work well with you.
There are three things I want to clarify before we get started. First, this tutorial will focus on giving you a better understanding of the photo process, it is not to speed it up. As well as this is not for someone who is submitting images to a publication. This is to help the everyday modeler take better photographs of his or her models to share online.
Another thing is the time frame of photographing your model. This is not a 5 minute job. Just like building models, If you rush it your results will be shit. You’re going to have to take your time with this process. It could be two or three hours.
And the last point is cost. This is not a cheap and easy way to photograph your models. Nor is it going to be expensive. But there will be a few items you will need if you’re to complete this tutorial.
Let’s start with a brief discussion about the pros and cons of DSLR’s, point & shoot cameras and why not to use your mobile device. Some types of cameras outperform others and the old saying “You get what you pay for” holds true in photography. But if you know your camera’s limitations and work within them, you can capture some quality images.
Digital single lens reflex (DSLR) and Mirrorless DSLR offers the greatest control over the look of your photos along with having better image quality. They have the ability to switch lenses unlike point and shoot cameras. But it comes with a steep price and a higher learning curve.
Point & shoot cameras(P&S) are compact and user-friendly cameras. They offer similar features like their more expensive siblings. But have simplified controls along with the inability to change lenses.
Mobile devices have come a long way from a few years ago but the major drawback is that they lack control. You can not select your aperture, shutter speed, ISO… anything to control the look of your image.
But before we continue, there are some basic photography terminology you must know and understand. Don’t be intimidated with these new terms, it’s just part of the learning process.
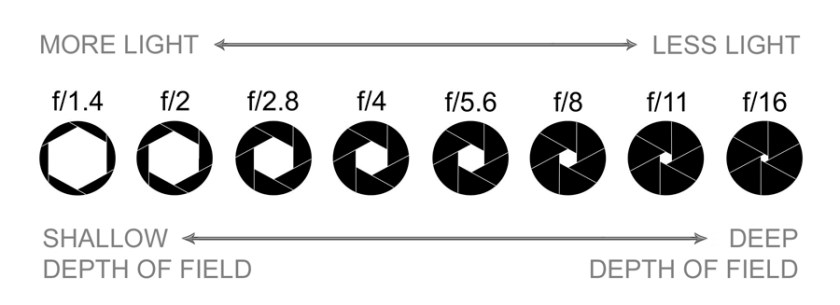
Aperture is the opening in the lens that lets light pass through and enter the camera. It is measured in f-stops. Here’s where it gets weird, the larger the f-stop, the smaller the number. For example, f/1.8 is a large f-stop and f/22 is a small one. The aperture also controls the depth of field in your image. More about that below.
Shutter allows light to pass through the lens in a time frame. Shutter speeds are measured in fractions of a second. Example, 1/500th, 1/400th, 1/320th.
ISO is how sensitive your camera’s sensor is to light. For example, an ISO of 100 means the sensor isn’t very sensitive. And at ISO 3200 is more sensitive. The trade off is at high ISO the grainier the image.
Depth of Field (DOF) is the area in front and behind the focal point that’s in focus. Controlled by the aperture, the larger the f-stop like F/2.8, the shallower your DOF. And with a smaller f-stop like F/11, the larger your DOF. And the closer you are to your subject, your DOF gets compressed. Meaning if you focused on something about 12 inches away @ f/2.8, your DOF will be very shallow, like an inch or less. But if you focused on something 100 ft away, your DOF will be measured in feet and not inches.
Exposure is simply how light or dark your image is. Which is determine by a combination of aperture, shutter and ISO.
Exposure Compensation allows you to override the exposure selected by the camera’s light meter, in order to darken or brighten your image. Have you ever taken a picture of something and the photo turned out too dark or light? It’s because the cameras light meter sees things differently then we do. For example, if you focus on something that is white, the camera sees it as super bright and wants to select the fastest shutter speed it can. Resulting in an underexposed image that is dark overall. This is due to there was not enough light getting to the sensor during the extremely short time the shutter was open. And the opposite happens with dark subjects, the camera wants to select a longer shutter speed. Making the image look too bright and washed out due to too much light reaching the sensor.

Below is an example of using exposure compensation. The first image was shot with no compensation and looks a bit dark. The second is a full stop under(-1) which is way too dark. And the last is a full stop over(+1).


White Balance is the color temperature in your image. Setting it can be frustrating and tricky. Even I, a seasoned photographer doesn’t like playing around with it.
Auto focus points: Your camera has multiple auto focus points to select what is to be in focus. If you’re using a DSLR or P&S camera, you’re going to have to know how to select and change the auto focus points. Look in your camera’s manual to learn how. And if you don’t have or lost it, check Google for an online manual.
File type: For sharing images on social media and various online sites, you do not need the complexity of shooting and processing a RAW file. For this tutorial as well as to simplify things, Jpeg will do fine.
If you’re new to photography, I know that this is a lot to digest. But the more you know and understand the terminology associated with photography, the better off you will be. There are a bunch of informative sites out there to further help your understanding. Remember, Google and YouTube are your know it all friends.
Let’s get into what you’re going to need for your photo shoot.
Camera: If you have a DSLR, Mirrorless DSLR or a point and shoot, the process are pretty much the same. Don’t try this with your mobile device.


Lense: You don’t need a super expensive lense to photograph scale models. Most kit lenses that comes with DSLRs will do fine. You don’t want to use a wide angle lense because they tend to distort the perspective and produce unnatural looking images.
Tripod: If you don’t have one, it’s time to get one. They come in all shapes and sizes. Search your favorite online store for “small tripod” and find one that is in your price range. My only advice is don’t get a flexible/bendable leg tripod. The ones that look like insect legs.
Backgrounds: Just like your kits, don’t be cheap. Do not use a bed sheet, driveway or sidewalk. What you want is a smooth seamless solid color material that is larger than your model. Preferably neutral colors such as tans and grays.

I have two different methods for setting up backgrounds. The simpler way is to use any large flat surface. Such as a big piece of foam core or a large tabletop so when I zoom in and tilt my camera downwards, it fills the frame. This does require more space but it’s super easy. The only drawback is you can only shoot the model so low before you start to reveal the lack of a vertical background. But you can get around this by having a solid color surface such as a wall close to it.


The other method uses a wall to hold up your background with a few pieces of tape. Let whatever material you’re using naturally curve from the wall to the surface your model is on. This will create a seamless and clutter free backdrop behind your model. This setup allows you to place your camera as low as you want.


Shutter Release: An essential tool to remotely fire the shutter without touching or disturbing the camera.
Self-Timer function: If you don’t have a shutter release, the self timer is the next best thing. Most DSLRs and P&S cameras have some form of a timer feature. Turn to your manual to how to access it.
Photo editing software: If it’s Photoshop, Lightroom, GIMP or whatever program, you should have a basic understanding of the program to edit your images. I suggest searching on Google and YouTube to find informative tutorials. If you do not have any editing software, look here for an available free program.
https://www.techradar.com/best/free-photo-editor
Another editing option is to do it on a tablet or iPad. Adobe Lightroom is available on iPad as well as Photoshop Express Photo Editor.
Now that we gone over some new vocabulary along with gathering our photographic supplies, it’s time to shoot right?! Not yet. Before we start taking pictures, we must set up the photo shoot.
Photo shoot setup
You probably noticed that “lighting” is not included in the list of things needed. This is because the Sun will provide all the light you will need. Moreover, using sunlight as our light source means we do not have to deal with setting up multiple light sources. I suggest shooting on a sunny day over a cloudy one. Also, using the Sun as our light source make selecting our white balance simple.
We are going to set up our photo shoot near or in front of a window but not in direct sunlight. Shooting in direct sunlight will cause the highlights on your model to be too bright along with the shadows too dark. I often set up my photo shoot on a wall that is 90 degrees from the light source window. I’ll use a large table and sometimes even use the floor for my shooting area. Make sure you have plenty of space to move your model in various positions along with room to move your camera around the photo shoot.

As I discussed earlier, I have two ways to set up backgrounds. Whatever method you’re going to use, make sure it’s larger than your model so that it fills the frame. It’s time to move on to setting up the camera.
Camera setting
- Firmly attach your camera to your tripod.
- Turn ON your camera.
- Take lens cap OFF.
- Make sure auto focus is ON.
- Turn the flash OFF. There is no need to introduce a new light source. Plus, using the flash at such close range, will produce harsh, unnatural and distracting shadows.
- Plug in shutter release or switch to timer.
- Select “Aperture priority”. On most cameras it is labeled “A” or “AV”. Then select a F-stop somewhere in between f/10 to f/16. I can’t tell you the perfect F-stop that will have the best depth of field for your model. You’re going to have to shoot, check your depth of field and adjust accordingly. If your depth of field is too shallow, change it to a smaller F-stop (larger number), reshoot and review.
- Select an ISO in between 100 and 200 to reduce the digital noise.
- If your P&S has a Macro setting, make sure to switch to it.
- Set your White balance to “Auto” or “Sunny”.
- File type, Select the largest and finest Jpeg.
Now that we have our background and camera set up, now it’s time to start taking pictures. It’s not as simple as placing your model in front of the background and start snapping photos. There are a few things we must consider as we take photos.
Photo process
• While looking through the viewfinder or rear display screen, look around the model to make sure the background fills the frame. Make sure all you see is the background color.
• Select and change the auto focus point to the most logical area of interest on the model. Such as the cockpit of an aircraft, the turret of a tank, the bridge of a ship, eyes of a figure…
• While the shutter is open, do not touch the camera, tripod or the table your model is on to ensure it remains completely motionless. The shutter is going to be long. Don’t worry. This is not action photography with lightning fast shutter speeds. Let the camera do its thing and wait to see the results.
• After the shutter closes, review the image. Is the image in focus and sharp? If not, reshoot it and make sure you don’t move the camera, tripod or your model.
• Is the depth of field covering the whole model? If not, change to a smaller F-stop (larger number)
• When you’re reviewing the image on the rear LCD screen, ask yourself “Do I like this shot?” If not, recompose and reshoot until you’re happy. Remember, the number of photos you can take is only limited to the size of your memory card. So, take as many as you like.
• If your image is too dark, you’re going to want to overcompensate to get a proper exposure. Start at +1/3, shoot and review. If it’s still dark, compensate some more until it looks right. And do the opposite when your image is too light.
Basic shots
If you struggle with the artistic part of photography, don’t stress. Let’s go over a few basic shots to help you show off your model. Here’s a few shots to try.
Three quarter front
Three quarter rear
Sides
Underside
")
")
")
")
Don’t be afraid to play around and try something different. Move around the model and when you see something that catches your eye, place your camera in the same location as where you saw it and take a picture. Review the image to see if it matches the image in your minds eye. If not, zoom in or out, get higher or lower, move left or right… shoot and review until you feel you got the shot you were looking for.
Detail shots
With the basic shots out of the way, it’s time to capture all those wonderful little details. Something you should be aware of for both DSLRs and P&S cameras, are focus limits. All lenses have a minimum distance it can focus in on something. Meaning if you’re too close to your model and try to focus the lens, the auto focus will hunt around and not “lock on”. If this happens, just move the camera a couple of inches away from your model and retry. Here’s a few ideas for detail shots.
Weapons
Wheels and landing gear
Head and taillights
Flight controls
Intakes, engines and nozzles
Cockpit of aircraft, bridge of a ship, turret of a tank, face of a figure, grill of a car…
Panel lines and markings


Keep your background and model in place while you review your photos. So, if there is a photo that didn’t turn out the way you liked, you can easily reshoot it. While reviewing your images, check the depth of field, sharpness of the photo and overall aesthetics. Once you’re happy with your images, take down your background and put your model away.
Sorting your images to share
Now that your photo shoot is over, it’s time to download your images to your PC or whatever device you’re going to use to edit them. Selecting what images to share and what not to share can be frustrating. You want to select photos that highlight the features of your model. Maybe it’s the paint job or weathering, some custom or scratch-built item. It’s those things you want to concentrate on. And on the flip side of that, you don’t want to flood your viewers with a ton images that’s very similar. It’s a balancing act for sure. Below is a link to my sorting process which I developed over the years and can help you with the pain of sorting.
https://anadventureinawesome.com/2020/03/26/the-pain-of-sorting/


Post Process
Post process is where we are going to edit our images with photo editing software. If it’s photoshop, Lightroom or even GIMP, the task should be the same. How you achieve them will vary from program to program. Removing dust spots, leveling the image, adjusting exposure, resizing and resharpening are the things you want to accomplish. If you do not know how to do these tasks, again Google and YouTube are your know it all friends.
Again, this is not the only way to photograph scale models. This is just a process I’ve developed and use successfully for years. And you can see my results on my website. Every image was shot using this natural light process. Remember, have fun and keep learning new stuff about photography and your gear.
Until next time,
Steven
Steven – thank you for this. My model shots are not consistent and I do not understand enough about my camera to figure it out on the fly. The other problem is that I really can’t “see” the image until its on a computer screen. But this is something I want to improve and be more consistent at. I also think some post production clean up would help a lot too. Thanks again for posting!
Your welcome! Glad you find it helpful 👍🏾
Thank you for the in depth and detailed guide for photographing scale models!!!
I’m glad you found it helpful!